TODO: make a todo list

Ignore the paradoxically ludic title. In this article I’m just sharing some notes on how to use Emacs’ org-mode.

In this post we will cover how to:

  1. Create your TODO list
  2. Track the progress of your tasks
  3. Schedule tasks
  4. Show your agenda

Create your TODO list

Start by playing with a sample todo list. Just add an item with an asterisk (*) and you can hold ​`​alt` and press ENTER to add a new item under the same column. If you wish promote or demote that item you can hold `alt` and use the arrow keys to add or remove asterisks (shifting between columns).

org_mode_basic

Here are some useful commands:

TAB to collapse / expand a single section.
SHIFT + TAB to collapse / expand all sections.
SHIFT → & SHIFT ← (right and left arrows) to set TODO and DONE marks to the item on that line.
M – → & M – ← (alt + right and left arrows) to promote / demote a given item.
C-c /      filter tree of TODO items (e.g., “t” will only show the items marked as “TODO”).
M – x org-sort-entries to organize the list in [alphabetic, numeric, creation-date, etc.] order.

Track the progress of your tasks

Put a [ 0 % ] next to the first item at the top of the list and it will be automatically updated as you mark “TODO” items as “DONE”.

org_mode_percent

If you create checkboxes with the `-  [  ] ` notation, you can tick these checkboxes with C-c C-c.

Schedule tasks

C-c [   adds file to the front of the agenda file list.

C-c C-s    schedule

org_mode_scheduling

C-c C-d    deadline

Show your agenda

M-x org-agenda

( a )  Agenda for the week.

Under ” a ” (All tasks for the current week)

org_mode_agenda

Press ” f ” (forward) to go to the next week.

Press ” b ” (backwards) to go to the previous week.

( t )   all TODOs.

( s )  Search for keywords.

Just a quick cheat sheet here, hope you enjoy!

Bonus tip: The org-jira mode

Installation:

  1. M-x list-packages
  2. C-s   (search for “org-jira”)
  3. Press ” i ” (install) to mark the org-jira  for installation.
  4. Press “x” to execute the installation of the marked packages.
  5. Add the following to your ” ~/.emacs.d/init.el ” file:

    (setq jiralib-url “<jira_url>”)

    (require ‘org-jira)

  6. Then, once you restart Emacs, you can try:

    M-x org-jira-get-issues

YAKBP – Yet Another Kubernetes Blog Post

What is Kubernetes? Here’s the description from the official doc:

“Kubernetes is an open-source system for automating deployment, scaling, and management of containerized applications.”

So, let me take a step at describing it in a more verbose way (touching some low-level details):

It’s a Golang-based solution that interacts with an underlying container engine (usually, Docker) to spin up groups of containers, known as “pods”. This is done through agents (kubelets) deployed on multiple servers or VMs (nodes) that are managed through a centralized Kube Controller (i.e. `​kube-apiserver`). The state of the Kubernetes “Cluster” is stored on “etcd” (distributed key/value database) and the communication between pods, containers and nodes is performed through a virtual SDN (Software Defined Network).

Now, as always, diagrams for visual learners (with some AWS details we will talk about later in another blog post):

cacoo_kube_aws

Also known as “k8s”, it offers many features, such as:

  • Processing the heartbeat from kubelets along with a Quality Of Service (qos) management module that helps the control plane with its heuristics while scheduling pods against a given set of nodes (i.e., the Kubernetes scheduling process evaluates which nodes have “room” to accommodate new pods and it calculates CPU and Memory accordingly before starting any set of Docker containers). Also, through the instrumentation of the underlying Docker daemon, the Kubelet also knows when pods get “evicted” if, for whatever reason, a container crashes (it will also perform other operations depending on the Public Cloud provider that is serving the underlying infrastructure, e.g., While operating on AWS, it describes ec2 instances to process metadata information, etc.).
  • Working with a virtual network layer that facilitates the communication with pods and their respective containers. This is commonly achieved through the combination of technologies like Calico (Network Policies. Allows/Blocks communication between pods) and Flannel (Overlay network that encapsulates packages during the communication between nodes and their containers). Here is a diagram that summarizes this:

flannel

  • It provides mechanisms to easily deploy dockerized applications and/or micro-services with its respective configuration (ConfigMaps), sensitive data (secrets), storage requirements (Persistent Volumes), replication & load balancing (Replica Sets & Services) and, last but not least, nice CLI capabilities to scale the number of replicas up and down, including ZDT (Zero Down Time) deployment through rolling upgrades.

So, as you can see, k8s just rocks!

To illustrate a more tangible example of Kubernetes’ powers, I’m sharing below all the artifacts required for a small Proof Of Concept that involves Kubernetes. This is based on a project I’ve worked on some time ago, the source files can be found in Github repos:

The POC was conducted with:

The objective was to introduce a side-car container to the main User Interface (UI) pod, whose container hosts the front-end layer of the overall system, and perform TLS termination (i.e., take the inbound encrypted HTTPS request and forward it to the underlying back-end app in unencrypted HTTP format). To make things more interesting, there was also an extra requirement to reinforce Web Sockets support.

The idea was to load the “index.html” page hosted in the UI app and let the JS try to establish the Web Sockets communication through the WSS protocol:

var ws = new WebSocket("wss://"+window.location.host+"/mywebsocketsapp/echo");

The HTTPS communication hops through the Kubernetes overlay network and its “Service” forwards the request to the target pod. The entry point is the Nginx “side-car” container that mounts the k8s secrets containing the self-signed certificates required to initiate and terminate the TLS communication. The HTTPS request is then converted to HTTP and it finally arrives on the UI container (containing a Tomcat-hosted Java Web App).

If everything is correctly assembled, the following flow is reproduced:

poc_flow.png


To sum it up: Kubernetes will definitely make your life easier if you are trying to deploy a cloud-oriented solution. There are many gotchas and occult tips & tricks, but I will have to find some time to write about them. Hopefully in the next blog post.

Cheers!

Docker Docker Docker Dockerize everything!

In this post you will learn:

  • What is Docker?
  • How to install and run it
  • More about Docker images
  • How to return to the host-machine without killing my container?
  • How to use your own internal Docker registry to store images
  • How to push your image to Artifactory
  • The Dockerfile: Best practices & versioning
  • How to copy a Docker image to some other Docker host
  • Docker networking
  • How to monitor containers

So, let’s get started.

What is Docker?

It is magic powered by unicorn blood.

Think of it as a Virtual Machine but, instead of having the Operating System + Hypervisor layers below the application you want to run, it just shares a “sub-context” of the Linux Kernel and allows you to run other Linux’es within the same Linux — Completely separated virtual environments with their own libraries + OS tools + applications + exposed ports, etc. And why is it so cool? You might ask, once you assemble your container with everything you want, you can take a snapshot of that (which is known as a Docker IMAGE) and spin new containers. You can spin multiple instances of a given image, think of it in terms of OOP, where you can create instances out of a class, so you are doing basically the same thing by creating containers out of a Docker image.

containers_and_vms

Beyond the virtualized, isolated characteristics, it is really time-efficient. There’s no Guest OS to boot here so you can actually start your container in a split second with the software you want, that, according to the actual command you set for it, it will start that process in the foreground for whatever purpose. If it is a web or an application server, it will just come up straight away, ready to service requests.

How to install and run it

The installation is very straight forward, you can find the details in the link below:
https://docs.docker.com/engine/installation/

Don’t forget to start your Docker daemon:

# /bin/systemctl start docker.service

If you are in a Mac OS environment, find the little Docker icon on the top-right corner of your screen:

docker_running

Then you can start a container and play in a completely isolated / virtualized environment:
# docker run -it –name mycontainer centos /bin/sh

Quick review of the docker run syntax:

Parameter Description
-d (detached) Runs in detached mode (not interactive)
–name Name of the container
-h (hostname) Hostname within the Docker network
–link Allow communication with another container in the Docker network
-p (port) Exposed port ( <host_port>:<container_port>)
-v (volume) Mapped volume/disk path (<host_path>:<container_path>)
<image> Name of the docker image
-w (working directory) Initial directory for the container command
-t (tty / terminal) Assign pseudo-tty for the container
-i (input) Set STDIN of the container (interactive)

Here is a slightly more complex example (running a local project just to illustrate):

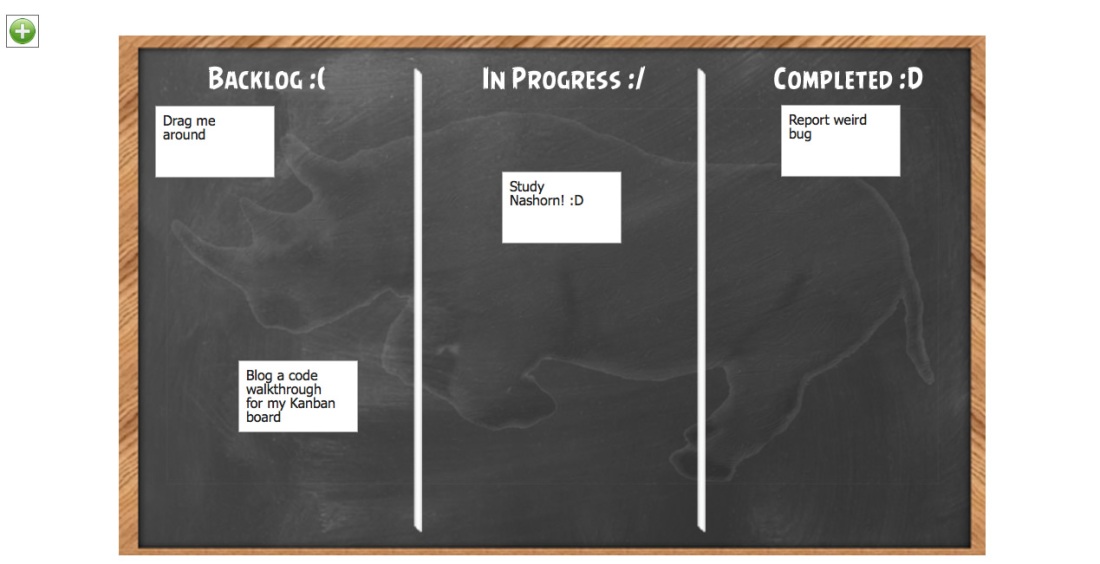
# docker run -d –name mykanban -h mykanbanapp –link mydbcontainer -p 8080:8080 -w /opt/mykanban -v /home/marcelo/Projects/MyOnlineKanban/mykanban:/opt/mykanban java:8 /usr/bin/jjs – cp lib/mongo-2.10.1.jar httpsrv.js

More about Docker images

So, let’s say I want to create my image with a “netcat” pre-installed. I would need to run:

# docker run -it –name my-docker-name centos /bin/sh

If that is the first time you are trying to spin a container out of the “centos” image, the Docker daemon will go to Docker Hub and get that image for you:

Unable to find image ‘centos:latest’ locally
latest: Pulling from library/centos
a3ed95caeb02: Pull complete
Digest: sha256:1a62cd7c773dd5c6cf08e2e28596f6fcc99bd97e38c9b324163e0da90ed27562
Status: Downloaded newer image for centos:latest

Then you can install what you need:

# yum install nc

Installed: nc.x86_64 2:6.40-7.el7 Complete!

How to return to the host-machine without killing my container?

If you entered a container with `docker exec` you can just type `exit` to leave the container. However, if you started a container with `docker run` then you should use the following shortcut:

ctrl+p ctrl+q

And now you can see that your container is still running (because you started it with a perpetual shell terminal process: /bin/sh):

# docker ps -n 1

CONTAINER ID PORTS IMAGE COMMAND NAMES

f03d4ba0a56f CREATED 22 minutes ago STATUS Up 22 minutes        centos "/bin/sh" nc-image

So you can now “commit” that container and create your first DOCKER IMAGE (i.e., basically taking a snapshot of the container and turning that state into an image):

# docker commit f03d4ba0a56f nc-server
sha256:ff5450d8c2733cd1edc68e9eda344b2a4f53e297a449e713bfb3cd72a9ddfa9e

Then it becomes part of the images available in this Docker Host server:

# docker images

REPOSITORY    IMAGE      ID             CREATED          SIZE
nc-server     centos     ff5450d8c273   6 seconds ago    278.8 MB

We can create new images out of base images for different purposes, we can even extend them for specific use cases.

image_hierarchy

How to use your own internal Docker registry to store images


Here is how you connect to it:

Go to artifactory, click on your user name on the top right:

provide the password once more and click on the gear icon to generate an API key (i.e., the artifactory encrypted password).

And, finally, login:

# docker login artifactory.yourcompanydomain.com:6556

Username: your.name@yourcompanydomain.com
Password:
Login Succeeded


How to push your image to artifactory

First we need to tag it:

Here’s the syntax => docker tag [OPTIONS] IMAGE[:TAG] [REGISTRYHOST/] [USERNAME/]NAME[:TAG]

# docker tag my-busybox artifactory.yourcompanydomain.com:6556/docker-images/repositories/dev/my-busybox:test- tag

# docker push artifactory.yourcompanydomain.com:6556/docker-images/repositories/dev/my-busybox:test-tag
The push refers to a repository [artifactory.yourcompanydomain.com:6556/docker-images/repositories/dev/my-busybox:test-tag] 06cc5a7ff579: Pushed
test-tag: digest: sha256:82b9618df57b5fc2ebed3d79c3d26e3ccb51e3f302348979b7534af555e2913a
size: 940

# docker images | grep test-tag
REPOSITORY TAG IMAGE ID SIZE

artifactory.yourcompanydomain.com:6556/docker-images/repositories/dev/my-busybox:test-tag  17 minutes ago 1.113 MB

Pushed and tagged.

The Dockerfile: Best practices & versioning

Committing your docker container into an image is a bad practice because the whole process is very manual and not very flexible. Imagine that you want to install an earlier version of “netcat”, then you will need to jump inside a container that was created out of the image you committed earlier and then uninstall & install another version of netcat. Or you need to create another container from scratch. It’s just too messy. Imagine a more granular change involving multiple points of configuration within the same container (e.g., service packs, JVM arguments, port configuration, OS-level tweaks, etc.), it’s a nightmare to manage all that by manually committing changes.

Therefore, do not commit containers !!! THAT WAS JUST FOR SHOW! — USE DOCKERFILES!!!

Following good automation practices: if you need to apply a number of custom steps to assemble your container, it is a bad idea to spin it and commit it. To solve that problem we use the “Dockerfile”.

dockerfile_versioning

1) Create a “Dockerfile” under your project folder: /home/user/Projects/my-nc-server

2) Introduce the instructions you need, e.g.:
FROM centos
MAINTAINER Marcelo Costa <marceloc@whatever.com>

RUN yum -y install nc
RUN yum -y install net-tools

3) Create a new custom image with the following command (running within the “my-nc- server” directory):

# docker build .
You can also introduce the [name-of-the-image]:[tag] notation with the “–tag” parameter:

# docker build –tag my-nc-server:test-tag .

*More info: https://docs.docker.com/engine/userguide/eng-image/docker

How to copy a Docker image to some other Docker host

You can also copy images as packages with the Save/Export & Load commands.

What is the difference between Save and Export? Answer: Save persists an image whereas Export persists containers.

Here is how you do it:

# docker save my-busybox >my-busybox.tar
# scp my-busybox.tar user@somemachine:/home/user/

Uploading….

my-busybox.tar 100% 1299KB 1.3MB/s 00:00

# scp user@somemachine:/home/user/my-busybox.tar .

Downloading….
my-busybox.tar 100% 1299KB 1.3MB/s 00:00

# docker load < my-busybox.tar
1834950e52ce: Loading layer 1.311 MB/1.311 MB

# docker images | grep busy
my-busybox latest 5d8cbe820583 About an hour ago 1.113 MB

Docker networking

Docker offers 3 types of network configuration: bridge, host and none.
You can define “none” if you want to waste a lot of time configuring everything yourself.

The “host” option sucks really bad — it replicates all the network interfaces of the Docker host into your container so there is no magic of isolated virtualization.

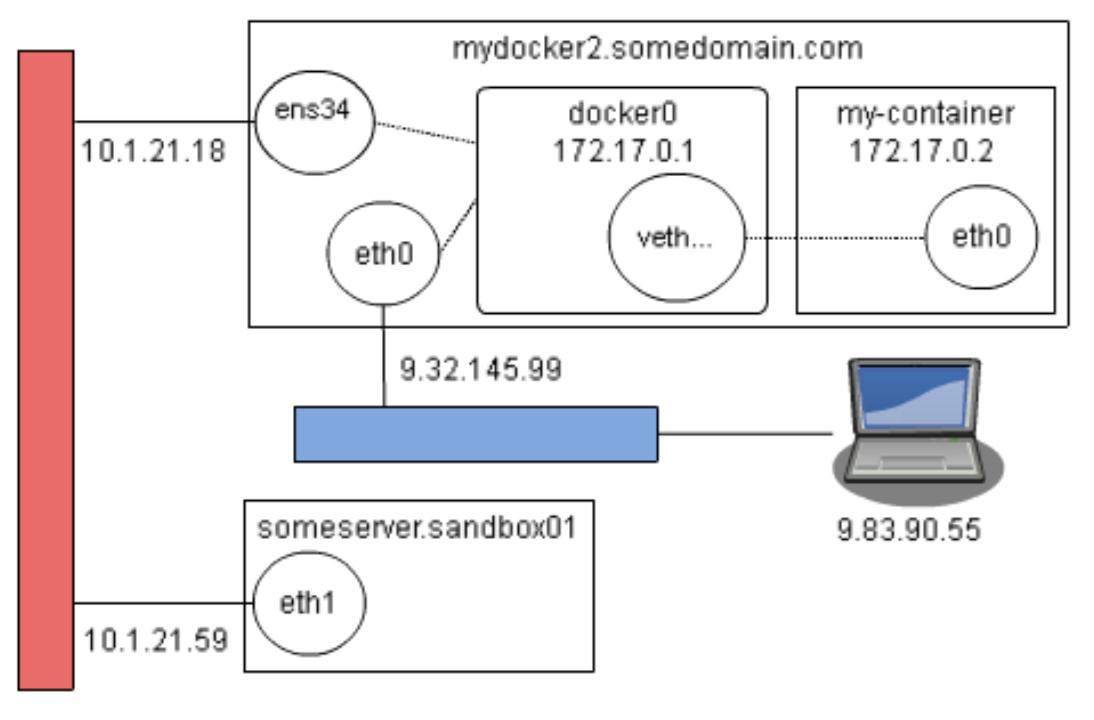
The default option “bridge” is applied when none of the others are specified. This option creates a “docker0” interface in your Linux and, for each container that you start, a Virtual Ethernet interface is created along with it (it is usually named as “veth<crazy_sequence_of_characters>”). Any requests that target a specific port that is mapped between the Docker Host and the Container will be handled by the docker0 network, forwarded to its respecting “veth” and then it will fall in the “eth0” of the container.

e.g., sandbox01 → dockerhost : ens34 :: docker0 :: vethXXX → container : eth0

An example of the how the network interfaces connect with each other:

docker_networking

Be aware that scripts under “/etc/sysconfig/network-scripts” that contain the name of that interface can potentially block this flow, depending on its instructions.

  • Yeah, a very specific caveat here… you guessed it right, I had faced an issue with that and got stuck for a few days on it 😦

How to monitor containers

Ideally, if you have a container orchestration system like Kubernetes, then you can consider sophisticated tools like Prometheus. If you just want to monitor containers from within the Docker host, here are some useful commands:

docker top
# docker top nc-server

UID PID PPID C STIME TTY TIME CMD

root 28524 28510 0 11:36 pts/1 00:00:00 nc -vv -l 8080

docker stats

# docker stats nc-server
CONTAINER CPU % MEM USAGE / LIMIT MEM % NET I/O BLOCK I/O PIDS

nc-server 0.00% 9.769MB/12.42GB 0.08% 48B/648B 9.409MB/0B 0

Keep in mind:

docker exec -it <container-name> /bin/bash
ctrl+p & ctrl+q (return to docker host)
docker logs -ft <container-name>

That’s it. Just some general Docker instructions that should bring you up to speed if you never play with it before, please provide suggestions to expand this article in the comments.

Playing with Emacs

Ok, here it goes…

Installation

sudo apt-get install emacs

BASICS

Add the following lines to your “~/.emacs.d/init.el” file:

(require 'package)
(add-to-list 'package-archives '("melpa" . "http://melpa.org/packages/") t)

*More about Emacs package management in this post from a Bulgarian dude.

Start Emac

  • emacs
    or
  • emacs -nw
    *I prefer to use Emacs in its “no-window” mode.

Find/Open files

C-x f  = file

MOVEMENT

emacs_mnemonic

Exit Emacs

C-x C-c

Marking, Cutting, Copying & Pasting

C-space = Starts marking
*(move around the document to select the fragment of content you want).

C-g = Cancel mark

C-w = Cut

M-w = Copy

C-y = Yank / Paste

Undo / Redo

C-x u = Undo

C-Shift _ = Redo

Save file

C-x s = Save

Moving between points of interest

Mark one or more sections of the document with C-space and C-g then use

C-u C-space = moves to the previously marked location

BUFFERS

C-x b = presents list of buffers at the bottom of the interface (aka: mini-buffer)
*move to the next buffer with C-s (step) and to the previous buffer with C-r (return).

C-x C-b = presents list of buffers on the main screen with details
*You can tag which buffers to delete with “d” and can undo that action with “u”

WINDOWS

C-x 3 = Splits the window horizontally

C-x 2 = Splits the window vertically

C-x o = Other. Moves to the other window

C-x 0 (zero) = Closes the active window.

HELP!

C-h k = Key. Press the key combination and Emacs will take you to the help page containing the instructions to it.

CUA Mode

To demonstrate the power of this feature, let us create an unordered list by writing some HTML code:

  1. Write a list of names:

Fat Mike
Melvin
El Hefe
Smelly

2. Enter cua-mode by typing “M-x cua-mode”. This cua-mode interface allows you to select text through rectangle marks. To start selecting, officially you have to type “C-Enter” (aka: C-RET), however, it did not work in my Xubuntu’s terminal, if C-RET does not work for you, the key mapping for this function must be customized. Here’s how you do it:

  • While in cua-mode, type “M-x” to execute a command in the mini-buffer.
  • Type “M-x” followed by “customize-variable”, press ENTER
  • Type “cua-rectangle-mark-key”, press ENTER.
  • In this interface you can navigate to the editable text-field and set another key to replace “ENTER” (RET) in the shortcut that select text rectangularly t in cua-mode,  you can set this new shortcut by reproducing the desired sequence and the character should be captured in the text-field. Once the new key is set you should navigate to the “Apply and save” link and press ENTER. (I have selected C-. to be the new shortcut for my rectangular selection).

Now that your cua-mode selection is working, select all 4 names in the list starting at the end of “Smelly” and marking the text all the way up to “Fat Mike”, i.e., the beginning of the first line. Now type “<li>”, you will see that it will move all 4 lines and replicate the typing in all of them:

<li>Fat Mike
<li>Melvin
<li>El Hefe
<li>Smelly

3. You can disable the rectangular selection by pressing the shortcut once more (e.g., C-. ). If you wish to add an attribute to all the “list item” tags (<li>) you can move the cursor within the tag and select all the rows once more within the same column. Start typing and you should get:

<li id=”punk”>Fat Mike
<li id=”punk”>Melvin
<li id=”punk”>El Hefe
<li id=”punk”>Smelly

4. If you want to introduce some sequence of numbers you can achieve that by pressing “M-n” (numerical sequence). Move the cursor to the end of the value of the “id” attribute and, with the rectangular selection within that column , add an underscore character (_) and press “M-n”. The mini-buffer presents the options to add the sequence (“start value”, “Increment”, etc.) just press ENTER to accept the default values and you should see the result:

<li id=”punk_0″>Fat Mike
<li id=”punk_1″>Melvin
<li id=”punk_2″>El Hefe
<li id=”punk_3″>Smelly

That concludes the cua-mode section.

Emacs as a Python IDE

Here’s how to install the “elpy” mod against Emacs to introduce some Python IDE features:

Type “M-x list-packages”, wait until it connects to the packages’ repository and press “C-s” to search for the package called “elpy” (you can browse back and forth between packages by pressing C-M-s and C-M-r, respectively. Again, consider the “step” and “return” words to remember these navigation options). Once you find the package, press ENTER and confirm the installation.

The next step is to initialize the Python IDE features by editing your “~/.emacs.d/init.el” file (and include some lines to fix some key binding issues):

;; Fixing a key binding bug in elpy for snippet expansion                                                                          
(define-key global-map (kbd "C-c k") 'yas-expand)
;; Fixing another key binding bug in iedit mode                                                                                    
(define-key global-map (kbd "C-c o") 'iedit-mode)

(elpy-enable)

The “elpy” mod includes some cool features, such as:

  1. Syntax highlighting / colors
  2. Auto-complete
  3. Interpreter failures / Static Analysis
  4. Special shortcuts to increase productivity

Common productivity shortcuts

M-; = Comment multiple lines of code. Select the same lines and use the same shortcut to uncomment the code.

C-c C-r r = Refactor. It presents refactoring options (e.g., extract a given snippet of code and move to a separate function).

C-c k = Expand Kode. It can auto-complete the common format of a given function, e.g., for, if, etc.

C-d = Documentation. Checks the correspondent excerpt from the help page related to a given function or Python instruction.

C-c C-e = Simultaneous Editing. This shortcut allows you to rename the name of a given variable or function by changing all the occurrences of that variable or function within the same script simultaneously. Use the same shortcut again to leave the edit mode.

C-h m = Manual. Presents an instructions manual with all the key bindings associated with the modes/mods that are being used in that given buffer.

Flyspell-mode

M-x flyspell-mode = This will enable a real-time spell checking mechanism, it’s one of the “Minor Modes” that are shipped OOTB with Emacs. Once you enable it, the words will turn red if they are misspelled. In order to check the suggestions press M-$ and the options should show up at the top of the screen.

spell-check.jpg

Version Control: Emacs & GIT

M-x vc-diff = This command shows the difference between the local modified version of the file and the version that is currently committed into the HEAD.

C-x v u = versioning-undo. It discards the changes that were staged since the last commit.

C-x v ~ = Open a specific revision (just need the first characters as the input) in a separate buffer.

C-x v l = versioning-log. Open log showing all the revisions associated with the file currently opened in the buffer.

  • You can browse through the revisions and press “f” when the cursor is on a given revision ID to open it on a separate buffer.
  • You can also see a diff report between the selected revision and the subsequent one by pressing “d”.

C-x v i = insert. It adds a file to the staging area within the emacs interface.

To stage, commit, push and pull within the Emacs interface, you can download a new package called Magit. Once you download it, restart Emacs and check the status of the staged/committed files by running M-x magit-status. Here are some of the main commands:

  • s = Stage (add) the file(s).
  • c = Commit the file(s)
  • b = Switch to a different branch.

More info here: https://www.emacswiki.org/emacs/Magit

To play with these shortcuts, I recommend you change the default behavior for GIT’s commit message editing and add Emacs as its default text editor. While committing with Magit, remember to use C-c C-c to leave the current buffer where you edit the commit message.

Here are the commands to make this change:

$ git config --global core.editor "emacs -nw"
$ export GIT_EDITOR="emacs -nw"

* But of course, you can always use the ” git commit -m ‘my message’ ” approach, then the text editor doesn’t matter.

To be continued…


Damn you “localhost” ! ..and other musings about documentation

We code stuff.

And, at some point, for some of this stuff, we create documentation.

We do this to explain how the awesome stuff we create works or to provide some guidance to layman on how to use it, sometimes even both pieces of information are provided. People forget stuff, move to different companies, different teams, they die, convert themselves to Orthodox Latvian, for whatever reason, there’s a point where a given piece of technology has to be maintained and extended, and the documentation is one of the pillars of such endeavour.

There are many formats for a given documentation:

  • Official documentation: Vague, dull and filled with subliminal messages that reinforce the brand around the software’s manufacturer.
  • Blog post / Wiki page: Way better. Sometimes hosted internally in some web-based collaboration system, Blogs and Wikis are widely used to document whatever is developed and can be extended through comments the and collaboration of all the team members. Personally, I like Blogs. The informal tone of it makes me enjoy the learning process.
  • The code: Behold the pseudo-axiom that states “The code IS the documentation”. It is never outdated and, if done with elegance, it is clear enough to guide everyone through the understanding of whatever has been implemented. Code comments can at times smooth things up depending on how cryptic a given snippet of code is perceived.
  • The ticket: Provides full awareness of the timeline of the story / task /defect. If you have some sort of Agile Planning or bug-tracking solution that connects to the actual source-code management system, that is even better. However, it gets polluted really fast with comments, misleading information and attachments (logs, screenshots).

But of course, there are other ways to document things, some interesting practices might involve recording a presentation followed by a demo, uploading the slide deck, making the video available somewhere. How about a podcast with your fellow programmers? Or perhaps letting the newcomers dig through the code and ask them to produce the documentation as part of their ramp-up process?

The catalyst for this post was an incident that happened a long time ago, in a galaxy far far away. One of the Ops guys followed some instructions on a wiki page to recreate some collections in a SolrCloud environment, the instructions had something similar to this:

Once you ssh into the server execute the following command: 
http://localhost:8983/solr/admin/collections?action=DELETE&name=theCollection

The problem is that the Ops guy accidentally logged into a Production server instead of the Staging server he was looking for and, suddenly, all the indexing data from thousands of customers were gone, in the blink of an eye. I’m not exposing the exact command that was executed but, just so you known, we have proper SSL configuration to avoid any misguided interaction with our SolrCloud API, however, the usage of the client certificate is obviously granted to the Operations team.

localhost

So, here is the question: Can/Should we blame the documentation? Some might think we should integrate some additional mechanism within the existing security API to avoid such mistakes, or, even easier, we could wrap the command around a bash script that would present some scary ASCII art with skull and bones to let the user know that he is about to run that command against a particular ip address / hostname and this is a sensitive operation, anyway, regardless of the approach, this kind of goes against the “fix the process, not the problem” principle. After we restored the collection from backup, the documentation was adjusted with a placeholder:

http://<insert_hostname_here>:8983/solr/admin/collections?action=DELETE&name=theCollection

Through this exercise of sharing my personal musings involving documentation, I guess I will take a step at some compilation of best practices to create good documentation. Hopefully, the following guidelines can be adapted to different types of documentation, even if it is about architecture, features, troubleshooting steps, etc.

#1 – You must have empathy

Try to put yourself in someone else’s shoes. Yeah, this one can be extremely relative and vague but, just like everything else in life, I believe it is interesting to try to leave the proper breadcrumbs and send the elevator back to help other people to reach that level of understanding you have. just imagine how amazing it would be if you could avoid all those IM windows that are constantly blinking while you try to concentrate and write some code, just reply with “RTFM” (Read The F**ing Full Manual) and send the link. Keep the following resources in mind:

  • Write an overview
  • Provide links to other resources
  • Expand acronyms
  • Collect feedback once you post it and amend if necessary

#2 – Help the visual learners with some diagrams

Describe the basic architecture and, perhaps even dive into the components involved in the request flow. For automated operations, another idea is to describe a timeline of events and present the entities involved in the orchestration. Use point #1 as a guidance on which visual elements would be more appropriate for the scenario you are working on.

pipeline

#3 – Name it, tag it and categorize everything

The documentation you create is useless unless it can be found. So make sure you put some meaningful name and add some tags to make it easy for your internal collaboration system to index it properly. Group the pages into sections that make sense and advertise your documentation in your next technical update or knowledge sharing session.

Of course, there is no silver bullet. The documentation will become outdated, even the code can turn into a misleading amalgamation of legacy and working methods (some people don’t realize they have a version-control system so they decide to leave old stuff in the code “just in case”). However, with the proper set of references, links and comments (or other forms of general collaboration), there are alternatives to find the up-to-date information, either by going to the ticket and checking the latest updates on it or by checking the commit history of the components associated with the use case under investigation.

Now, I want to collect some feedback on this post so just comment if you feel there is something missing here.

Cheers!

The incredible #zip -u

The customer called… according to him, a functionality that was working fine, mysteriously stopped working and it is up to you to investigate the problem. Just a reminder that you have those 17 items in your backlog that were supposed to be finished yesterday and this new incident is high priority, the phone won’t stop ringing, several business users are calling, the manager is coming towards your desk, the walls are closing in… you just found the component and… look at that? The company was outsourcing the project so It was developed by some other team back in ancient times. That’s just great! In summary: Just another happy day in the IT world.

Ok, so here’s one of those posts where I share a walk-through on how to troubleshoot a problem with a Java Web Application. Let us assume that you already mapped the issue on the client-side, opened your browser’s Web Debugger (e.g., Firefox’s Firebug or Chrome’s Dev tools), read the Javascript code and found out that something in the back-end is messed up and it is not producing the expected result.

When you move on to the server-side, bear in mind that, in order to understand what the application is doing, you will have to READ CODE. Unfortunately, it is common to find situations where comprehensive up-to-date documentation is not available.

Let’s say that a class called “ChaoticUtils” shows up in some stack trace in the Application Server’s logs, how can we find the class and investigate further? Assuming that you don’t have access to the source, or, even worse, you can’t trust the release management process! In such cases it’s best to just get the JAR and decompile the class (you will be 100% sure you are looking at the exact same code that is being executed there). However, as you know, in the Java world it is common to have lots and lots of JAR packages that can be used for extensions/dependencies. In order to find the JAR package of a specific class, you can use this tool: “Whereis.jar“. Here’s how to use it:

$ java -jar whereis.jar CaothicUtils /opt/company/webapps/

Here’s the output generated by this tool:

/opt/company/webapps/ext_ear/APP-INF/lib::ext-links.jar::com/company/xxx/utils/CaothicUtils.class

Now let’s decompile this class to see what is going on. I recommend this tool called “JD Decompiler“, just load the .jar package into the program and it will decompile all the classes. Here’s a screenshot of its interface:

ext-links-jarIn case the root cause can’t be identified straight away just by looking at the code, you can introduce additional logging lines, e.g., System.out.println will print messages to the standard output (stdout) of the Application Server. So the objective would be to change the class or a JSP that is stored within a WAR or a JAR package to add these additional log messages, and, to speed things up, we are going to do that without having to unpackage, change the files and recreate the package.

So, without further ado, I introduce you to the incredible ‘zip -u‘!

For the ones that have some experience with Linux, the zip command is something very common, but I would like to focus on a specific parameter of this command: -u.

-u Replace (update) an existing entry in the zip archive only if it has been modified more recently than the version already in the zip archive. For example:
zip -u stuff *

Imagine that, in order to debug a JSP or a class, we would have to insert some lines of code to see if the variables were being populated accordingly, we certainly don’t want to unpackage every .war or .jar to insert a modified JSP or class during the troubleshooting.

For situations like that, you can use “zip -u”.

Of course… using the decompiled code to perform Remote Debugging is also an option, you can just set some breakpoints in your IDE and visualize the values of each variable through the DEBUG interface, here are the JVM arguments that you can use in order to do that:

-Djava.compiler\=NONE -Xdebug -Xnoagent -Xrunjdwp\:transport\=dt_socket,server\=y,address\=6065,suspend\=n

Anyway, in order to update, let’s say, a JSP inside a .war package we need to create the same folder structure outside the war and place a copy of the JSP inside this structure, for example:

chaotic.war
|– scripts
|– common
.  |– jsps
.    |– links
.      |– example.jsp
|– WEB-INF

If you are in the same directory as the ‘chaotic.war’ file, use the command “mkdir -p jsps/links” to create the folder structure and then copy the JSP to the ‘links’ folder. After you modify the JSP using your favorite editor (e.g., Emacs or vi) you just need to run the following command:

$ zip -u chaotic.war jsps/links/example.jsp

You should see something like this:

updating: jsps/links/example.jsp (deflated 66%)

** Bear in mind that it is necessary to redeploy the .ear package if you are updating a .jar inside ‘APP-INF/lib’ or the .war if you are updating a JSP or a .jar package, this is done through the Application Server, that’s how the changes take effect.

You can follow the same approach for classes inside a .jar package. If there is no Logger configured in the class and you are adding the good ol’ System.out.println() all over the code, you can discover what is the standard output (stdout) of the messages that are being generated by this class by following this approach, first run this command:

$ ps fuxa | grep java

Then identify the PID of your Application Server:

someuser 11058  3.6 10.1 2607008 1660612 ?   Sl   May13 225:40  \_ java  -Dprogram.name=run-default.sh -server -Xms1536m -Xmx1536m -XX:MaxPermSize=192M -XX:PermSize=192M -XX:+UseParallelGC -Xloggc:gc.log -XX:+PrintGCTimeStamps  -XX:+PrintGCDetails -XX:+PrintTenuringDistribution -XX:-TraceClassUnloading -Djava.net.preferIPv4Stack=true -Djava.endorsed.dirs=/opt/company/jboss-4.2.2.GA /lib/endorsed -classpath /opt/company/jboss-4.2.2.GA/bin/run.jar  org.jboss.Main -c default -b 0.0.0.0

Now, check the File Descriptors associated with this Process ID, by doing that we can identify which logs this process is writing to:

$ ls -la /proc/11058/fd | grep .log
l-wx------  1 someuser somegroup 64 May 17 14:44 1 ->  /opt/company/jboss-4.2.2.GA/bin/scripts/stdout_stderr_201105130805.log

Or you can just search for the text fragment you added to the log lines, assuming that you added a line that produces “###linkVar###” in the stdout, you can run:

$ find /opt/company -type f -print | tr '\n' '00' | xargs -0 grep -i ####linkVar####

And with that, we come to the end of another post.

I hope “zip -u” makes your life easier, if you have any cool tips for troubleshooting or productivity, please share with us in the comments section below.

Cheers!

Object Oriented Programming with Java and Javascript

Hello fellow readers, it’s been a while since last time I blogged so here’s a quick post to review some basic OOP concepts, three of them to be more precise: Inheritance, Polymorphism and Encapsulation.

First you need to know what a class  is, it is that piece of code that you can use to instantiate objects, here’s an example in Java:

public class Beer {
    String name;
    double alcoholUnits;
}

And a similar example in Javascript*:

var Beer = function() {
    var name;
    var alcohol_units;
}
*Which is not really a “class” per se as JS doesn’t have classes, but functions can be defined in specific ways so they can be instantiated as objects.
 

Here’s how you would test the Javascript version  in your browser (Chrome’s Developer Tools or Firefox’s Firebug):

Heineken

So, moving on to Inheritance and Polymorphism, let’s use the following Friday Quiz question to illustrate these concepts:

Santa sometimes helps the elves making toys.  He can make 30 toys per hour.  In order to prevent getting bored, he starts each day building 50 trains and then makes 50 aeroplanes.  Then he switches back to trains, and alternates until the end of the day.  If he starts work at 8:00 am, at what time will he finish his 108th train?

public class SantaToys {
    static Toy train = new Train();
    static Toy aeroplane = new Aeroplane();
                
    public static void main(String[] args) {
        Toy toyInProduction = train;
                
        for (double numOfToys=0;true;++numOfToys) {
                                                
            if(toyInProduction.counter!=0 && toyInProduction.counter % 30 == 0){
                if (toyInProduction instanceof Train){
                    toyInProduction = aeroplane;
                    toyInProduction.increment();
                } else {
                    toyInProduction = train;
                    toyInProduction.increment();
                }
            } else {
                toyInProduction.increment();                                
            }
            
            if(toyInProduction.counter>=108){
                System.out.println("it took " + numOfToys/30 + " hours to create 108 trains!");
                break;
            }
        }
    }
}
class Toy {
    public int counter = 0;        
    public void increment() {
        this.counter++;
    }
}
class Train extends Toy {                
}
class Aeroplane extends Toy {        
}

Let’s talk about what’s going on there, if you skip the “SantaToys” class and focus on the last 3 classes within this little program: Toy, Train and Aeroplane, you will find an example of inheritance in OOP.

Inheritance

Toy is in a higher level of abstraction and both Train and Aeroplane are specializations of that base class, i.e., Train and Aeroplane are toys (duh). So the cool thing about Inheritance is that it organize the entities involved in a given context and facilitates the coding process.

The subclasses inherit the attributes and methods of the parent class, in this case, both Train and Aeroplane will have their own “counter” attribute and the “increment()” method, which means, the results of the increment method will affect only that specific instance, if we increment the counter for a Train object, that means the integer value within the counter variable will be incremented for this instance only (this is another aspect of OOP languages, they have mechanisms to refer to object instances, usually with keywords like this or self). Even if you call the method from a reference variable defined through an abstract class (Toy), the correct increment method will be determined during runtime, so it’s like having a Toy that can transform itself when some action is invoked, that’s what we call Polymorphism.

polymorph

Polymorphism is achieved when you use an abstract reference of an object to invoke some functionality and, as a result of the mapping of the reference variable on the stack and the actual object’s instance in the heap, different methods will be executed. Refer to the toy analogy above if this one is too boring.

So, just for the fun of it, how about implementing the same in Javascript? 😀

var Toy = function() {
        this.counter = 0;
    this.increment = function() {
        this.counter++;
    }
}
var Train = function() {}
Train.prototype = new Toy();
var Aeroplane = function() {}
Aeroplane.prototype = new Toy();

var num_toys = 0;
var train = new Train();
var aerop = new Aeroplane();

var toy_in_production = train;

for(var num_toys=0;true;++num_toys) {
    if(toy_in_production.counter != 0 && toy_in_production.counter % 30 == 0) {
        if(toy_in_production instanceof Train) {
            toy_in_production = aerop;
            toy_in_production.increment();
        } else {
            toy_in_production = train;
            toy_in_production.increment();
        }
    } else {
        toy_in_production.increment();
    }

    if(toy_in_production.counter==108) {
        console.log("it took " + num_toys/30 + " hours to create 108 trains!");
        break;
    }
}

In Javascript, we don’t use the “extends” notation to define subclasses, instead we use prototypical inheritance to link objects in a hierarchy (there are other methods to achieve inheritance with Javascript, e.g., call() & apply() or object masquerading, but I prefer this one), in Javascript every object’s constructor has a ‘prototype’ property and, in cool browsers like Firefox and Chrome, you can see a property called __proto__ that is a reference to the prototype property of the object’s constructor, Czech this out!

proto

If we link this property to a bunch of key/value pairs, we can inject new properties into an object but if we assign a new object to the prototype property, then the assigned object (Toy) becomes the “parent object” of the owner of the prototype property (instance of Train|Aeroplane), that’s because, when we invoke an object’s method, the Javascript interpreter will search for that method within the object itself, if it can’t find it, it will search for it inside the prototype and it will keep doing that until it finds the method (or just returns undefined), here’s an example:

Toy.prototype
Object {}
Toy.prototype.newFunction = function() { return "meh"; }
function () { return "meh"; }
train.newFunction()
"meh"

See what happened there? I have added a new function(method) to Toy and I have invoked the new function from the sub-object (train), Train doesn’t have the new function but its parent-object does, so the interpreter walked the Prototype Chain to find the method we were looking for.

Now that we understand inheritance with Javascript, the rest is pretty much the same, we can increment the specific instances of Toy through polymorphism and get to the result we want.

Now let’s move on to our final topic: Encapsulation.

300px-Capsule_3

Imagine an application that manages sensitive data from a group of People (e.g., Big Company or a Bank), we can write the following classes to accomplish this objective.

public class Test {
    
    public static void main(String args[]) {
        CarbonBasedLifeform joeBloggs = new CarbonBasedLifeform("Joe Bloggs", "987-65-4320");
        System.out.println(joeBloggs.name);
    }
}
class CarbonBasedLifeform {
    String name;
    String SSN;
    
    public CarbonBasedLifeform(String name, String SSN) {
        this.name = name;
        this.SSN = SSN;
    }
}

In this code we create a class called “CarbonBasedLifeform” and we created an instance, Joe Bloggs, now imagine that some other programmer is adding more stuff to the program and they start messing around with some of this data, what if they change Joe’s Social Security Number? Or even his name? We don’t have anything to protect the access to the attributes of the class, so it can be easily done:

joeBloggs.SSN = "0987654321";

If people could just modify each other’s documents and alter personal data like that, what an odd, disturbing world that would be. Joe is the only one that can go through the bureaucratic loops to get a new documents, this stuff is private, that’s why it is a common practice to add modifiers to the class attributes along with special methods to control the access to their values, i.e., the Getters & Setters:

class CarbonBasedLifeform {
    private String name;
    private String SSN;
    
    public CarbonBasedLifeform(String name, String SSN) {
        this.name = name;
        this.SSN = SSN;
    }
    
    public String getName() {
        return this.name;
    }
    public void setName(String name) {
        this.name = name;
    }
    public String getSSN() {
        return this.SSN;
    }
    public void setSSN(String SSN) {
        if(verifyRedTape())
            this.SSN = SSN;        
    }
}

Now, the other classes can’t change Joe’s attributes directly, because the attributes are marked as private and the methods provide a mechanism to control how other classes interact with this data, that is known as Encapsulation or, in other words, don’t touch Joe’s privates!

In this example, the value will only be modified after Joe verifies the red tape involving his Social Security Number:

joeBloggs.setSSN("0987654321");

BTW, C# offers an interesting approach to write the same in a less verbose way.

private string name;
public string Name
{
    set { this.name = value; }
    get { return this.name; }
}

With Javascript, things are not so simple because, as Douglas Crockford described: “objects are collections of name-value pairs”, so we can dynamically define any property to any object any time we want, one approach that can be used to hide the value of a variable is to use Closures:

var Person = (function () {  
    var SSN = "";
    
    function Person(name, SSN) {
	this.name = name;
	
        /* Preventing any changes on the SSN property */
	Object.defineProperty(this, 'SSN', {
            value: "",
            writable : false,
            enumerable : true,
            configurable : false
        });

        this.getSSN = function() {
            return SSN;
        };
        this.setSSN = function(ssn) {
		    console.log("Check red tape here");
            SSN = ssn;
        };
	this.setSSN(SSN);
    }
    return Person;
})();

When the object is instantiated, it executes the IEF (Immediately-Executed Function) and returns the inner “Person” function that holds a special reference to the variable SSN in the outer function (i.e., closure), this variable can only be accessed by the public methods within the object that is returned, so it simulates the behaviour demonstrated in the Java class.

var p = new Person("Marcelo","444");h 
Check red tape here 
undefined
var p2 = new Person("Joe","777");
Check red tape here
undefined
p
Person {name: "Marcelo", SSN: "", getSSN: function, setSSN: function}
p2
Person {name: "Joe", SSN: "", getSSN: function, setSSN: function}
p.setSSN("111")
Check red tape here
undefined
p2.setSSN("222")
Check red tape her
undefined
p.getSSN()
"111"
p2.getSSN()
"222"
p.SSN = "999"
"999"
p.SSN
""

In summary, the encapsulation is used to protect the data within an object and also to  manage the access to this data, although it is not recommended to blindly create getters & setters for all your objects without a good reason, it is a common practice in OOP and, specifically for Java, Object Relational Mapping (ORM) frameworks (e.g., Hibernate) rely on this coding convention in order to abstract the database interaction using the objects’ instances.

So that’s it for today, please share your comments below and let me know if you liked today’s post. Excelsior!

Devops: Buzzword or the catalyst to fight conformity?

I have been meaning to write about this for quite some time now because this is the kind of stuff that should be chewing on every techie’s ear lately. Let me summarize the concept of DevOps from the point of view of a typical old-school manager (it’s funnier this way):

“ANARCHY! Developers jumping out of their cubicles and bashing into the server room bringing chaos and instauring pandemonium within the company”.

Now, here’s what it really means:

 “To bring Development and Operations together to build and deliver software more effectively and efficiently”.

This is cool but I want to take this post beyond the main aspects of DevOps, a good Release & Deployment process is definitely a  subject for an extensive discussion but the essence of it, the restlessness, that’s the point I want to touch today.

We love technology, we love to experiments with the “new toys”, either hardware or software (in my case, specifically, it’s definitely software due to budget issues), but I sincerely believe that the majority doesn’t want to assimilate any of these latest libraries/middlewares/APIs/Frameworks/methodologies/egregores frivolously, there’s value behind these tools, otherwise we wouldn’t have the hype around them and all the companies (or independent entities) behind such technologies wouldn’t be succeeding as they are. Now here comes the challenge: how do you introduce these changes to your project? It helps if you are the Senior Developer, it’s even more helpful if you are the Team Lead, but what about mere mortals, developers that are fighting on the trenches on a daily basis, or even enthusiasts that are labelled as “Systems Engineer” or “Support Analyst” (Yeah, I’m including myself in this category) that just don’t have a voice to break paradigms, some of them will give up and comply, another group will leave the company and there are those that will turn the apparently irreversible mess into something better.

I will present the archetypes that I’ve defined for each one of these developers (or IT Professionals in general):

The first group that gives up can be classified as “Furniture that writes code” – They are the guys that come to work everyday to do what they’re told, never bring anything new to the table, wait until 5 PM so they can go home and wait for Death to pay them a visit.

WinstonChair2

There’s the second group that I call “The Prodigious Tourists” – These guys (and girls) are geniuses, they carry a bias against mainstream stuff like Java or .NET, always leaning towards trending stuff, most of them would write a “Hello World” and start spreading the word about the new “silver bullet” that is out on the market, everything that you use is legacy technology for them, their skills are just as good as their ability to keep whining about all the company problems without presenting any tangible idea to solve them. They will, in most cases, leave the company to work for some cool startup where the receptionist is dressed as a Pokemon, then, as its product/service catalogue evolves, this company hires a consultant, things start getting too bureaucratic and they will pack their bag and move on to the next one.

nodejs

And then we have “The Mavericks” –  Office pariahs, people in the coffee room laugh at them because of their crazy ideas, they want to improve things, naive day dreamers that should not be near a server, they will struggle with their limited network access & awareness of office politics to enhance processes leaving a trace of rejected Proofs of Concept along the way.

cody

Maybe my interpretation of the latter is a little bit hyperbolic, but this one brings us closer to the profile of someone that needs to be involved in your company’s DevOps initiative, or any other cultural- change initiative for that matter. The restlessness should go beyond DevOps, the term was coined and gained notoriety to tackle a specific (and critical) problem: deliver software; So did “Agile” and “Extreme Programming” that came before it, but what about other inefficient processes that you have identified within the company? Why do you need 5 tickets to copy a file to that Websphere node? Why does your security request takes 3 weeks to be processed? Why Developers are not committing their Stored Procedures into version-control? Every company has similar issues and it’s easy to ignore them despite the pain and over-bureaucracy that they bring to your project, you can say that the problem lies in another department and, therefore, it’s out of your scope or that you don’t have a voice, no political power whatsoever, to raise a flag about these problems so you can’t do anything about it, these are all valid points as long as you wait for the right moment to strike and don’t let this inconformity flame be squelched, the worst excuse that I can imagine is the classic “That’s the way things are done around here”:

5monkeys1ladder


I heard about Hudson (proprietary father of Jenkins) before the “Continuous Integration” revolution, the little DTSTTCPW programs that were being used for Unit Testing arose way before the “Agile Manifesto”, but the methodology only becomes evangelizable when these cool buzzwords start flying around, which is definitely beneficial because the manager likes whatever he reads on trending magazines.

dilbert

That’s why DevOps is so cool, it gives you an opportunity to play with the new toys and, most important, to fix processes, the road to build and deliver software has so many aspects that present many opportunities to enhance and/or eliminate many things. Now you can finally share your opinions and ideas, you can externalize all your frustration.

office_space_printer

That’s it, if your team has a lot of messy processes and you are worried about how you should approach DevOps, there’s a brilliant talk by John Esser entitled “Creating a Culture for Continuous Delivery” that gives you 8 lessons to start breaking the paradigms with your company, I believe it’s an amazing place to start. You can read about the tools, install Jenkins on your machine, code a bunch of automation scripts but in the end, the company culture will present itself as the most challenging obstacle. Good luck!

{Code Walkthrough} Online Kanban Board with Nashorn

Hello hello my fellow Nashornians, this week I present to you a quick Code Walkthrough on my latest invention: The Online Kanban Board. I’m sure there must be thousands like this out there (better ones I bet) but I decided to code my own when some Support colleagues from work were trying to find out what one of the team members was working on, beyond being the best “tasks bottleneck” detector, this is a nice resource to help everyone to talk about their activities in a good old stand-up meeting, but be aware that meetings can be dangerous. Use the KISS (Keep It Simple, Stupid) principle, get everyone in a room, decide among each other who’s gonna be the “meeting leader”, organize the post-its for each person and go around the room asking these 3 little questions:

  1. What did you achieve yesterday?
  2. What will you do today?
  3. Are you blocked or do you need assistance?

Don’t let the meeting take more than 15 minutes.. if you need to do some code review or brainstorm, schedule other meetings for that, define the agenda and… wait, I’m digressing too much on this subject, let’s see some CODE! 😀

Ok, I won’t dive too much on the ‘httpsrv.js‘, it is just a humble upgrade to the one Jim Laskey wrote in his official Nashorn Blog, I just took his code and added some stuff that wanted because command-line I/O wasn’t interesting enough for me to start playing with it, so my version is handling HTTP POST requests and I’m loading a controller.js file to handle non-static-file requests, I will go through the interesting bits later on.

So, let’s start with the HTML and CSS, at the end of this section we should see an interface like this:

kanban

Here’s how the files were structured:

folder_structure

The HTML is quite simple, as you can see, I’m just linking a bunch of stuff that I used to create a good client-side experience ( JQuery-UI for the Draggable and Editable components), then there’s the ‘mykanban.js’ file where I have the code that will be sending the AJAX requests, the post-its will be loaded within the ‘container’ div.

<!DOCTYPE html PUBLIC “-//W3C//DTD HTML 4.01 Transitional//EN” “http://www.w3.org/TR/html4/loose.dtd”&gt;
<html>
<head>
<meta http-equiv=”Content-Type” content=”text/html; charset=UTF-8″>
<title>My Kan Ban board – JQuery + Nashorn + MongoDB</title>
<link rel=”stylesheet” href=”/mykanban/assets/css/jquery-ui.css” />
<script src=”/mykanban/assets/js/jquery-1.9.1.js”></script>
<script src=”/mykanban/assets/js/jquery-ui.js”></script>
<link rel=”stylesheet” href=”/mykanban/assets/css/style.css” />
<link rel=”shortcut icon” href=”http://localhost:8080/mykanban/favicon.ico&#8221; />
<script src=”/mykanban/assets/js/jquery.jeditable.js”></script>
<script src=”/mykanban/assets/js/mykanban.js”></script>
</head>
<body>
<div id=”header”>
<div id=”menu”>
<input id=”addPostIt” type=”image” src=”/mykanban/assets/img/add-icon.png” name=”addPostIt” width=”30″ height=”30″>
</div>
</div>
<div id=”overlay” visible=”false”></div>
<div id=”container”>
<!– post its here –>
</div>
</body>
</html>
</body>

The CSS is also simple, I’ve used an old trick to centralize the container div on the page, you can read about it on Maujor’s website (Brazilian guy that is known as the CSS master!):

#container {
position: fixed;
top: 50%;
left: 50%;
margin-top: -300px;
margin-left: -500px;
width: 1000px;
height: 600px;
background: #fdffe5 url(“../img/background.jpg”);
}

The client-side Javascript starts by loading all the post-its that are stored in the MongoDB database, it sends a GET AJAX request to the controller which loads the MongoDAO.js and call the ‘readAll()’ function, once the json data is retrieved, it takes the data and call the ‘addpostit()’ function so the draggable div elements can be created, each one with their respective id, task String and position.

$(function() {
    //load post its
    $.getJSON(‘/mykanban/controller.jjsp?action=read’, function(data) {
        var items = [];
        $.each(data, function(key, val) {
            if(data.postits.length>0){
                for(var i=0;i<data.postits.length;i++) {
                    //alert(“ID: ” + data.postits[i]._id);
                   //alert(“TASK: ” + data.postits[i].task);
                   //alert(“POSX: ” + data.postits[i].posX);
                   //alert(“POSY: ” + data.postits[i].posY)
                  var postitid = data.postits[i]._id;
                  var task = data.postits[i].task;
                  var posx = data.postits[i].posX;
                  var posy = data.postits[i].posY;
                  addpostit(postitid,task,posx,posy);
           }
     }
});

It produces an output similar to this one:

{
    “postits”: [
        {
            “_id”: “3”,
            “task”: “Study Nashorn! :D”,
            “posX”: 7,
            “posY”: 86
        },
        {
            “_id”: “6”,
            “task”: “Report weird bug”,
            “posX”: 764,
            “posY”: 80
        }
    ]
}

Here’s the controller.js, it handles the data that comes from the client-side and process the Mongo-related actions:

load(“./mykanban/dao/mongoDAO.js”);
function Controller() {
    this.readData = function() {
        return “{ \”postits\” : [” + mongoDAO.readAll() + “]}”;
    }
    this.deleteData = function(params) {
print(“to be deleted: ” + params);
try {
    mongoDAO.delete(params);
}catch(e){
    print(‘Error while deleting the object from Mongo: ‘ + e.printStackTrace());
}
return generateResponse(mongoDAO.readAll());
    }
    this.processData = function(params) {
print(params);
try {
    mongoDAO.create(params);
}catch(e){
    print(‘Error while saving the object into Mongo: ‘ + e);
}
return generateResponse(mongoDAO.readAll());
    }
    function generateResponse(data) {
        var HTML = ” “;
        return HTML;
    }
}

It would be cool to come up with some dependency injection mechanism here.. but let’s leave that for later. The DB Persistence layer is comprised of two files ‘MongoDAO.js’ and ‘MongoConnector.js’, the first one loads the second because the connector contains all the “imports” (MongoDB driver) and, now here comes the coolest part, the ‘mongoConnector’ function, which creates a singleton in Javascript through a closure:

var mongodb = Packages.com.mongodb;
var MongoClient = mongodb.MongoClient;
var MongoException = mongodb.MongoException;
var WriteConcern = mongodb.WriteConcern;
var DB = mongodb.DB;
var DBCollection = mongodb.DBCollection;
var BasicDBObject = mongodb.BasicDBObject;
var DBObject = mongodb.DBObject;
var DBCursor = mongodb.DBCursor;
var ServerAddress = mongodb.ServerAddress;
var JSON = mongodb.util.JSON;
var Arrays = java.util.Arrays;
var mongoConnector = (function() {
    //Singleton
    var mongoConnector;
    function init() {
        return {
            getDB : function() {
            var mongo = new MongoClient(“localhost”);
            var db = mongo.getDB(“test”);
            return db;
           }
       }
    }
    return {
        //Get the singleton instance or create a new one
        getInstance : function() {
            if(!mongoConnector) {
                mongoConnector = init();
            }
            return mongoConnector;
        }
    }
    return mongoClient;
})();

For those of you who don’t know what a closure is (I won’t even ask about Singleton, just google “Design Patterns” to learn about it), I will try to explain it here (I want to highlight this concept because, to be honest, even though it might seem silly to many programmers, it took me a while to understand it), anyone can memorize “It is a function that returns an inner function that stores the variables defined in the outer function” but comprehending is a whole different story.

In my case here, I didn’t want to create an instance of my mongoConnector for every connection (hence the Singleton), but that’s where Javascript makes everything easier, the ‘getInstance()’ function stores the ‘mongoConnector’ variable that was declared outside its own block of code, notice that the ‘mongoConnector’ function (outer function) is executed only once, it is an IEF (Immediately Executed Function) because it calls itself right after its defintion, i.e., (function() {…})(); , it returns the inner function with the getInstance() function and, at this point, the init() function no longer exists, we won’t have any other expensive operation here, thanks to the closure.

Douglas Crockford’s video entitled ‘Javascript: Good Parts‘ gives a good explanation about it. Highly recommended.

Now our ‘MongoDAO’ can use this single instance for the MongoDB operations:

load(‘./mykanban/dao/mongoConnector.js’);

var mongoDAO = (function() {
//Get connector from singleton
var mongo = mongoConnector.getInstance();

//Select db
var db = mongo.getDB(“test”);

// get list of collections
var collections = db.getCollectionNames();

//Get mongodb collection
var dbCollection = mongo.getDB(“test”).getCollection(“test”);

return {
create: function(someObj) {
//save
dbCollection.save(JSON.parse(someObj));
},
readAll: function() {
var results = [];

var cursorDocJSON = dbCollection.find();

while (cursorDocJSON.hasNext()) {
var cDoc = cursorDocJSON.next();
results.push(cDoc);
}
return results;
},…

The greatest thing about this project is that it’s all JSON, end-to-end, even the create/update/delete operations involve the creation of a json formatted ‘postit’ data that gets sent to the controller and processed by MongoDB (JSON.parse()), here’s the function from ‘mykanban.js’ that creates a new post-it:

function updatepostit(element, value) {
var draggable = element.parent();

//alert(“id: ” +draggable.attr(‘id’));
//alert(“ID: ” +draggable.attr(‘id’).substr(9));
//alert(“html: ” +draggable.html());

var postit = {
“_id”: draggable.attr(‘id’).substr(9),
“task”: value,
“posX”: draggable.position().left,
“posY”: draggable.position().top,
};

$.ajax({
type: “POST”,
url: “/mykanban/controller.jjsp”,
// The key needs to match your method’s input parameter (case-sensitive).
data: JSON.stringify( postit ),
contentType: “application/json; charset=utf-8”,
dataType: “json”,
success: function(data){alert(data);},
failure: function(errMsg) {
alert(errMsg);
}
});
}

*I have to get rid of these alerts, old habits die hard.

That’s it. if you want to try it out just download the code from github, install MongoDB in your machine, start the database server (just run ‘mongod’, you might need to specify where the files will be stored, in this case use the –dbpath parameter, e.g., ‘mongod –dbpath /var/db/data’) and finally (assuming you have the JDK8 or the OpenJDK built in your machine with Nashorn) start the HTTP Server to see your Kanban board implemented with Nashorn, here’s the command:

$ jjs -cp lib/mongo-2.10.1.jar:. httpsrv.js

*Don’t forget to create some shortcuts to your JJS (Nashorn interpreter):

Mac OS = alias jjs=’/Library/Java/JavaVirtualMachines/jdk1.8.0.jdk/Contents/Home/jre/bin/jjs’

Windows  = Define an environment variable called ‘JAVA8_HOME’ and point to your jdk8 folder, then you can invoke jjs by running this command:

> “%JAVA8_HOME%\jre\bin\jjs” -cp lib\mongo-2.10.1.jar;. httpsrv.js

I hope you’ve enjoyed it, if you are a Javascript expert and identified any atrocities in my code, please PLEASE share your knowledge on the comments session below.

Have a Nashornian weekend, cheers!